Teaching Art is a feast into a of colour, line, texture, space and shape. By encouraging a visual exploration in my learning I love developing a creative approach to learning in the classroom. By encouraging different techniques and an understanding of art I hope to help students appreciate visual learning more. I hope you enjoy my uploads and can use them. Please contact me if you require any further information.
Teaching Art is a feast into a of colour, line, texture, space and shape. By encouraging a visual exploration in my learning I love developing a creative approach to learning in the classroom. By encouraging different techniques and an understanding of art I hope to help students appreciate visual learning more. I hope you enjoy my uploads and can use them. Please contact me if you require any further information.
The powerpoint consists of the following:
Students will learn about Wassily Kandinsky and his abstract Art and be able to make their own version of Kandinsky while listening to four pieces of music.
Task 1: Describing artwork tasks (slide2)
Task 2: Answer questions on Kandinsky (slide 3)
Task 3: Listening to music and interpreting this (slide 4)
Divide your paper into 4 blocks as seen in the example and in your blocks you need to draw what you interpret while listening to the four pieces of music.
Listen to the You Tube tracks of music - one at a time. While listening to the music in each block while you listen to the music you need to draw what the music makes you feel. (Copy the http address into search to hear music)
That is, you need to Interpret the music by drawing shapes, colours, textures, lines, forms, images and what you feel the music represents.
Looking at the work of Peter Blake- there is a page of information and questions on his work.
There are examples of his alphabet artworks and cover designs for Famous Music artists.
Students are inspired by his work of collage, photography and free drawing style.
Task 1. Students make their own Pop art alphabet style and this links to Graphics and students can look at Pop art letter styles.
Task 2 Students are asked to find their own popular things linked to each letter of the alphabet. Students are asked to make their own alphabet using the similar ideas as Peter Blake, but to focus on trying to create a favourite thing for each of letter of the alphabet. Students then put these ideas on an A4 or A3 paper. There are examples of different alphabets and student examples of final outcome.
Task 4 Students play with letters and take one letter and make this in various different designs This is a Graphics exercise and students learn to play with one letter and styles.
Task 3 Students put a collage together in the style of Peter Blake. Students should use lettering/ graphics and link this to their own favourite things and then make a collage of this in a 26cm square shape. students can use pictures from magazines , comics and newspaper and cut out and collage.
Task 5 Students should creatively now make their own album design. There are formats for the CD covers to use as a template. Presentation gives examples for inspiration of Peter Blake’s alphabet designs and album covers and looks at some of his famous Album cover designs. Students need to make their own CD cover of their favourite musician. Students to use a variety of media for final task.
year 7
Diagnostic for year 7
Celtic letters
Paper mache plants
Clay Gargoyles
year 8
Cubism
Making Insects - paper craft
Modern Movements - collage and paint
Surrealism - painting project
This is a unit of work for the first 12 weeks at school.
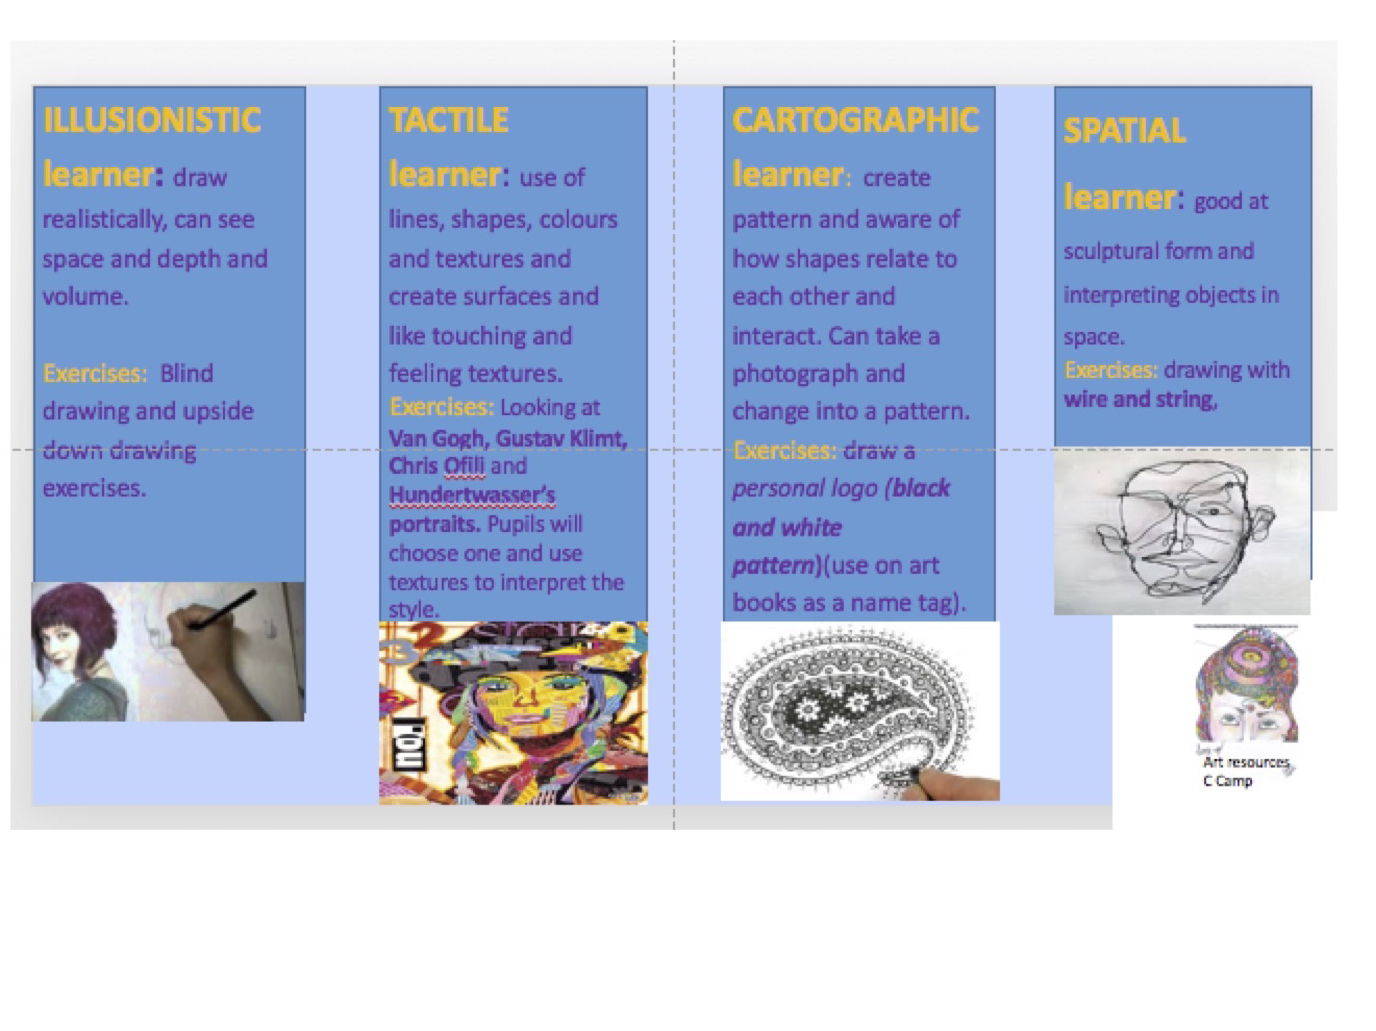
There are questions to assess the students knowledge of Art from KS2 and then a project to assess he strengths and skills of the students. This is a diagnostic project looking at the Illusionary, Spatial, Tactile, Cartographic skills of the students with tasks to do.
There is also a fun project on making a sketchbook and giving prompts to help students to be creative in the Keri Smith powerpoint.
A scheme of work starting with a pencil drawing, then a monoprint and the students interpret this in different artist styles.
Asian -British artist, Chila Burman and Frida Kahlo with a variety of different portrait artists to look at.
They use the monoprint and combine this with a Pop art collage
The students then take a photograph and then do a cultural drawing in felt tips interpreting this using cultural patterns.
I have also added a few other portrait powerpoints to use in the project.
• Learning Objectives
To reflect on examples of copies of drawings of different artists and illustrators and analyse the formal elements: shapes, tone, form, lines, texture, and marks.
• To investigate and interpret a variety of selected artists and discuss their sense of style and markmaking
• To study drawings with reference to their visual literacy and the formal elements (tone, texture, colour, line, form).
• To discover the different mark making skills of a number of different artists.
• To research, investigate and develop ideas in a personal way on an A2 sheet.
To develop a visual work of practical responses with annotations.
In this task students are to analyse the drawing styles of particular artists and begin to interpret these different artist’s styles in drawings of their own.
Students use the formal elements to analyse the artists and develop drawings using their own subject as a response with annotations.
• Students draw the hand/feet or a subject of their choice in particular signatures of a selection of artists.
• To reflect on examples of copies of drawings of different artists and illustrators and analyse the formal elements: shapes, tone, form, lines, texture, and marks.
• Try to use different drawing techniques as highlighted by the masters.
This is a good start to critical contextual analysis and gets students to look at a number of artists and develops their visual analysis skills .
Students to end with an A2 or A1 drawing sheet showing their subject in various styles.
In the first part of the powerpoint students are asked to listen to pieces of music and to formulate slogans from them.
Students then are asked to do a critical analysis of the work of Banksy by selecting one of his works and answering questions.
After this students are asked to copy a picture of Banksy and then make their own collage of his work using magazines and newspapers.
The theme of their poster is on the pandemic.
We will be learning:
To create a poster collage in the style of Banksy that describes the pandemic occurring and linking this to the UK
To use magazines, newspapers and pictures and to make a collage of these to create a poster.
To make a slogan, drawing the lettering or finding letters in magazies or newspaper.
Success Criteria
Your poster must include the following:
A key phrase or work linked to the pandemic
Two image that links to what is happening in the UK
or something that is key in the NEWS.
It should have graffitti style lettering and pencil work
Accurate shape outline
Good use of negative space
Link between font style and theme
Clear placements/readable
Students to be given a strip of paper and fold this into 8 sections. On the end two folds students make a front cover.
There is a You tube video link to this project.
In the six sections in the middle of the fold out paper there are 6 tasks for each of the elements of art.
Line, Shape, Colour, Texture, Space and Value.
Students on the one side of the fold out write information about the element and on the other side students are to do a drawing of the element as a creative response to each element
This is a fun project and the outcomes are successful.
We will be learning about Ben Heine and how he uses Drawings and Photography
Complete the questions attached:
Heading: Ben Heine
Create your own version of Ben Hearn.
IDEA 1
DOING A DRAWING IN A PHOTOGRAPH
Steps for success
Take a photograph and load this up on a Powerpoint.
Do a drawing to add to this photograph. Load this up on the powerpoint over the photograph. Remove backgrounds. Look at the examples of Pencil and Camera on slide 2 and 3.
You could try make it quirky, personal or relate to your situation.
It must not be an exact copy of the photograph but be combined in an original quirky way.
You may add in interesting ideas that change the photograph
IDEA 2
TAKING A PHOTO GRAPH AND ADDING IN CIRCLES
KEYS FOR SUCCESS
Take a photograph and DRAW over the photograph all the circles like the examples of Digital Circlism
Try to use your own photograph
Make it as unique as you can.
You could try make it quirky, personal and could relate to your situation.
Students learn to draw what is around them and simplify this into a basic painting
Students learn to use watercolour and explore techniques in sketchbook
Students learn about Henri Matisse and the random Fauvist use of colour
Students enjoy making a precious painting
Students learn about the basics in Art looking at the elements of Art
Developing an understanding of pattern
A good starter project on the basics in Art
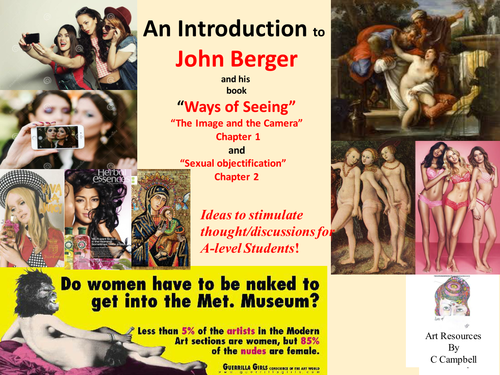
Looking at briefly two chapters of the famous John Berger book ’ Ways of Seeing’ It is difficult to summarise a book of such a wealth of knowledge and such a clever way of phrasing ideas.
The slide presentation gives one a sketch of two chapters. Chapter one which discusses the image versus the photo, seeing versus words and there are a few quotes from John Berger but also the link to the You tube clips.
This is a good A-level presentation and then to get the students to listen to the first two chapters on video clip.
Students need to question how an image has lost its meaning through the advent of the camera and begin to draw a comparison of images before the camera and after the camera.
Students should also look at how the way we have reproduced the female form through the ages from Antiquity to the 21st Century and think about the meaning of what it is to be nude and what it is to be naked. John Berger has a lot of ideas on this and there are lots of phrases from his book discussing this concept and showing some examples of this in some major artworks.
One can never make justice of this incredible book but the slide show does allow for discussion in the class on important concepts and understandings we have of images in our time.
This is a project where students are asked to choose an artist to study their style.
Student’s question and develop an understanding of What is a style?
Outcome of this project is that students in year 7 do their own portrait interpretation using the artists and create a mixed media collage based on the selected artist.
There is an exploration on using a variety of media.
Students develop their own skills exploring how to make their own portrait in the style of the artist.
Students use a photocopy of a photograph of themselves to work from.
There is an emphasis on experimentation and students can bring in found textures to collage.
Students use the four artists to make a copy of the four artists styles in a grid on a page: Hundertwasser, Klimt, Ofili and Van Gogh.
TASK 1
The first part of the project is the Artist Research in 4 grids. One for each artist.
Students in the grid discuss the characteristics of each artist’s use of line, colour, shape and texture. There is an individual slide on each artist which highlights with close up pictures showing the markmaking of each artist.
Teacher to go through each slide of each artist and copy the pictures as an example for students to work from.
Students write out the name in each gird, how each artist has a different way of using their marks and then in the grid copies a detail of the artist’s work. This is completed in pencil crayons. Students can also use an object and interpret this in styles - there is an example
Students also brainstorm words to describe the artist. Students also describes the use of elements in each work. Students also discuss the main characteristics of the artist and how they have used their line, colour, shape, texture and how the artist has composed the picture (that is, put it together).
This should take 2 lessons - with students completing the work for homework
TASK 2
Once students have analysed this they can go on to make their own portrait by choosing one of the artists. There are lots of examples of students work in this powerpoint to give examples of how to go about this project. Students to be given a photocopy picture of themselves to work from
This should take 3 lessons in class.
Objectives:
Use of found textures, collage materials and paint to interpret a style looking at the way the student experimented with the use of materials to create the style
Explore media creatively when interpreting artist.
Develop vocabulary and to understand the different ways of using lines, shapes and colours and students begin to analyse the artworks critically describing each work.
To begin to understand that each artist has their own way of interpreting their subject and each person has the own way of making their own style
To analyse and interpret four different artist’s styles and begin to make a personal response to one of these artists.
To complete a self- portrait in the style of an artist.
Firstly consolidating watercolour skills in this project the powerpoint then goes to look at the artist called Hundertwasser. Looking in depth at Hundertwasser, developing an Artist Study presentation after going to the computer room to find information on this artist and to analyse one picture of his work.
Students are then asked to on four separate sheets to draw out the key symbols and elements in Hundertwasser’s work. .
Students are then given pictures of buildings and asked to continue to apply his style and to make some drawings inspired by his work.
Examples of all these are given with student examples.
This project then further developed into making a clay tile after formulating an orignal own interpretation of Hundertwasser. There are plenty of student examples for you to look at.
I have also added further extension tasks on Hundertwasser and some further interesting facts about his work.
OBJECTIVES
To develop an understanding of the work of Hundertwasser by studying the elements from Hundertwasser’s work.
To copy some of Hundertwasser’s symbols with your pencil.
To draw out Hundertwasser’s Onion domes, Lollipop trees, Faces and Spirals.
To draw out a large picture of Lollipop trees of Hundertwasser and to use colour on this
To use pictures of buildings and then to imaginatively interpret one’s own version of Hundertwasser using the research ideas completed into his use of symbols
Students make up their own design of Hundertwasser in pencil and then in colour.
To make a clay tile based on the design steps above- examples of student outcomes are given.
Task 1 ‘Key Elements in the Art of Hundertwasser’
Copy out the picture given on slide 3 and label the key elements Hundertwasser uses in his work. You may use any materials you have to do this. It can be in colour or black and white with your pencil. Do this carefully.
A mandala drawing - showing basic steps - to build a patterned line drawing.
In this task the students are asked to draw 4 rings using any object they have at home to make the circular rings.
Students are then given clear instructions on how to break up the circle and are given examples of patterns to follow.
There is also a very good video clip which gives clear guidelines.
At the end of the making of the Mandala students are asked to do research into the Mandala and to find out what makes up a mandala. There are questions for students to answer.
A Still-life project basic one page 5 min scheme with Dirt and Weekly plan.
See the Still-life project on TES.
This is an overview of acstill-life project which entails drawing in different media a still-life composition. Below are a list of all the lessons.
ART THEMES before modern art. What? Modern Art? and Still-life?
Composition? Rule of thirds. Organising still life. Paper prepare: Black/brown paper: newspaper/music, Draw Still-life in line.
3 Exploring pencil mark-making techniques. Pencil tonal study of geometric shapes
4 Pop Art discussions – To make a 2D coloured flat shape area of composition
5 Explore with Oil pastel: Using oil pastel detail
6 and 7 Exploring pen mark-making techniques. To draw over a Cubism Collage using a biro pen
8 Exploring Charcoal techniques Drawing on black paper using white chalk/charcoal.
Research Artist study on Robert Raushenberg library
10 – Evaluation of still-life drawing project
11, 12 and 13 Mod roc Relief
14. Evaluation
This powerpoint is about drawing in charcoal and white chalk on black paper. Students collage a black piece of paper on their paper and then draw a part of their still-life using this technique.
The overall Learning Objectives are:
To develop my understanding of Art and pre-modern art and the meaning of a Still-life drawing.
To develop my observational drawing skills.
To create a Still-life drawing learning to draw carefully from observation with a viewfinder
To learn how to compose a composition using the rule of thirds and developing an understanding of the Golden Mean AND COMPOSITION PRINCIPLES
To develop a further understanding of Pop Art and do a flat colour paper shape detail in your drawing.
To develop my knowledge of the elements of art: lines, shape and form
To develop techniques in different media in my drawing and to explore markmaking of pen, pencil, oil pastel and charcoal.
To practise my observational drawing skills in the following techniques: oil pastel, drawing with a bro pen, using chalk and charcoal
To develop my knowledge of Robert Raushenberg (Pop Art) and practise drawing over a light printed surface with pencil.
To explore developing a relief surface of an area of my still -life drawing and develop this in mod roc technique
In this powerpoint there is cultural information on the symbolism of the peacock in Indian Art and a look at the peacock dance.
Students make a peacock feather drawing looking at a few essential oil pastel techniques: sgrafitto, layering, blending, stippling.
Students then are asked to evaluate this outcome and then as a whole class the second project on the powerpoint is that each student is now asked to make a peacock feather which could then be added to a drawing of the body of the peacock.
Resources given to support this.This could be completed in any medium, pen work or watercolour or oil pastel.
There are examples of different large peacock outcomes in different media and the teacher will need to decide how she would like to do this.
An visual reference to architectural features with reference to Classical Greek and Roman architectural features in Artworks, various building ornaments and different buildings.
There are lots of artists who have use classical architecture in their own art. Also lots of examples of artists and reference to examples of John Piper and his paintings on classical architecture and students could develop their watercolour techniques copying this artist. But there are a number of different artists to use to inspire students to develop their own technique.
Also, developing the style of John Piper in different techniques: for eg. wax painting, water-colour techniques.
**The resource includes: **
Examples of architectural artists
Examples of a student work collages of architecture Examples of student work of combining buildings into a collage
Resource sheets of architectural photographs of churches to use for studies
Resource sheets of different buildings ornamentations to use in collage
.
**Learning Objectives **
To develop a Classical Greek and Roman element in one’s work of art at KS3, KS 4 - GCSE Art and A-level Art
To study various examples of how artists have used these classical architectural elements in their works of Art
A look at various contemporary artists and how they have used the Classical elements and architectural features
To develop a collage combining photographs, painting and pen work.
Choose one of the artists and copy their style and collect examples of their work to use in your collage.
Take photographs of buildings in your local environment and use this in your collage.
The Powerpoint is a short set of 4 slides which gives the students 4 exercises to copy straight symbols and elements in the work of Hundertwasser. There are clear instructions for each task and printable slides for teachers to print off or merely to use on a screen in front and to copy onto A4 paper.
I have also attached the lesson plan - so there are clear instructions so students can even learn remotely.
A fun project for students to learn about the Art Nouveau Artist Gustav Klimt and to do their own interpretation using patterns to make their hair.
Students are asked to firstly read about Klimt and to answer questions.
Secondly students are asked to practice doing Zentangle patterns and look at the patterns of Klimt
Finally students take a photo of themselves or anyone else and paste this in an interesting position on their paper and begin to draw the Gustav Klimt patterns.
TASK:
Paste a picture of yourself, friend, family member and interpret the patterns of Klimt around the face.
Making hair-styles or clothes using Klimt’s patterns.
STEPS TO SUCCESS
On an A5 paper paste a picture of a person and draw Klimt patterns making a dress or hair around the face. Look at the examples on the sheet.
On your paper firstly divide the areas using lines into shapes around the photo of your face/head and begin to do Zentangle patterns in the shapes.
Use a pencil or a pen and try to draw light and dark contrasts.
Try to make patterns in the shapes. Use the video clip to help with making zentangles.